There is an exciting new feature on Genetic Affairs – AutoFastCluster!! You begin by entering your DNA matches and shared matches into the spreadsheet that’s now found inside Genetic Affairs. Figure 1 shows the new spreadsheet in Genetic Affairs.

You enter the data into the online spreadsheet, select the cM range that you want to use, press ‘perform autocluster analysis’ and in a manner of seconds your clusters appear. An example of my results is shown in figure 2. All the names are hidden for privacy.
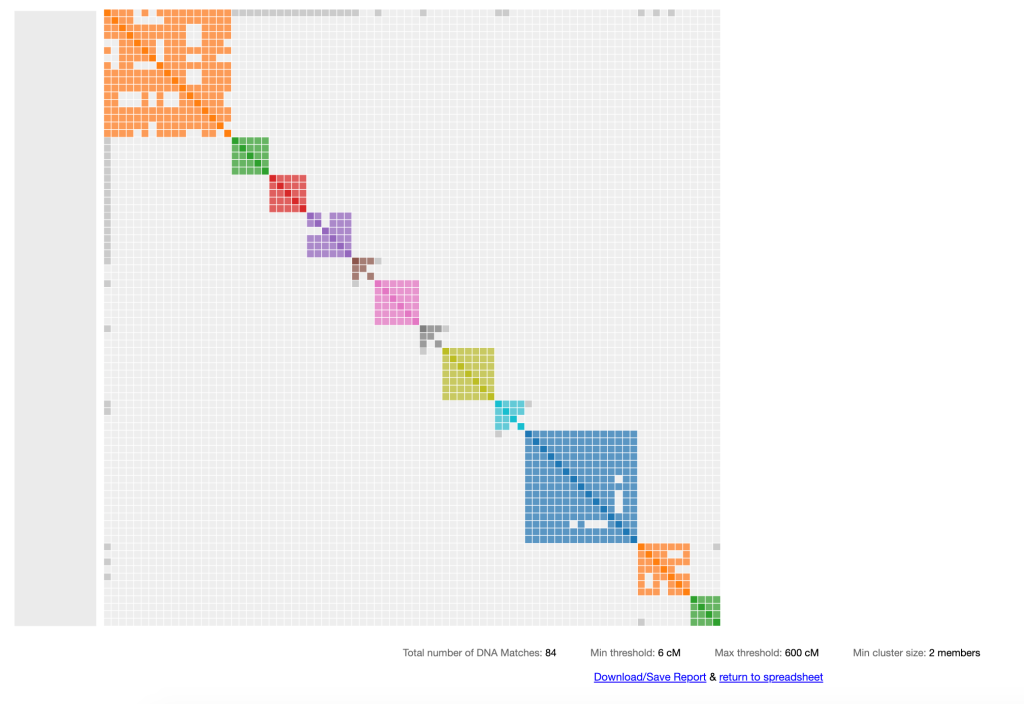
The first match in the orange cluster is my known 2C. She and I share great grandparents, Thomas Byrnes and Bridget Mary Fenton. I wanted to get all of her matches and their shared matches into one large cluster analysis. I used the online spreadsheet on Genetic Affairs, shown in figure 1, to enter my data for the analysis. The AutoFastCluster gives a table at the bottom of the image with AutoCluster information. Any of the notes you added to your match list will show up with that match in your cluster list. Based on chatting with various matches I’ve been able to find connections to several surnames in our family. Cluster 6, the pink one, contains surname Burns from County Roscommon, which is also where our Byrnes great grandfather was born.
Running an Analysis
To begin your analysis enter your DNA match, the amount of shared cM and any notes into the ‘Data match list’ on the left of the spreadsheet. Next you add your shared matches into the ‘Shared match list’ on the right of the spreadsheet. Figure 3 shows some data filled into the two lists. None of the matches real names were used in this example.
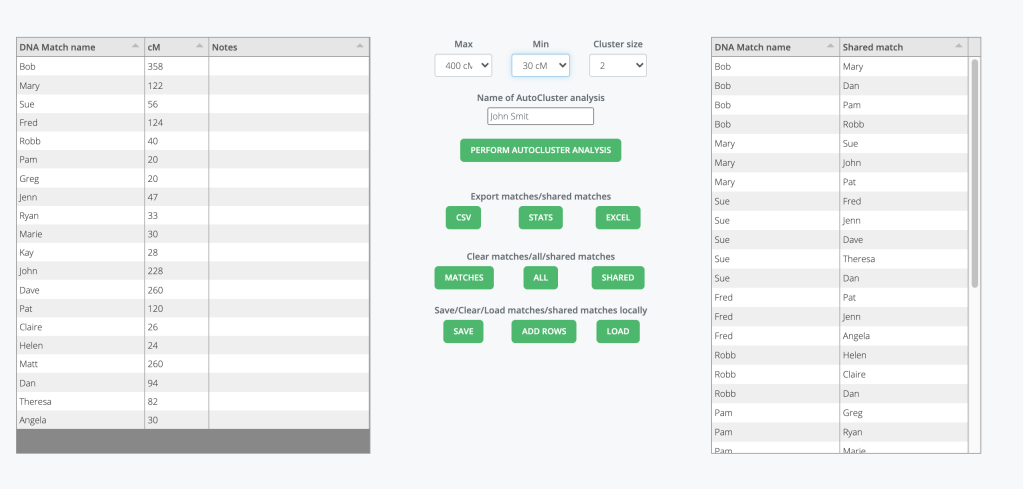
Once you’ve entered your data you decide what range for the max and min cM values. The highest cM value is 358 cM and the lowest is 20 cM, so I would run max 400 and min 15 cM.
At the bottom of your autocluster you have chose to save the cluster to your computer or go back to the spreadsheet page. Figure 4 shows these options at the bottom of figure 2.

I often run a small test cluster and then go back and add more matches to my spreadsheet. I find this particularly useful when I’m copying data from several different sites. When you go back to the spreadsheet after running your cluster, it will initially be empty but clicking on ‘load’ will refill both lists with the data you most recently ran, which makes it very easy to add additional matches and their shared matches.
Spreadsheet Options
There are a number of options shown on the spreadsheet between the two lists of data, as shown in figure 5. The Max, Min, Cluster size, and Name for the cluster are all used when you perform the Autocluster. Other options allow you to export your data as CSV or Excel file, choose to clear your match list, your shared match list or both of them. You can also save the match and shared match list locally in the program or add more rows to your lists if you need. When you’re making your match list you need a minimum of 10 DNA matches in it in order to run a cluster analysis.

Summary
The new AutoFastCluster feature provides an easy, rapid cluster analysis for your data. It is displayed directly on your browser, and you don’t have to wait for an email and unzip the attached files n order to see your clusters.
Advanced Paste Options
I have been collecting my match and shared match data in two CSV files in Excel. If you already have your data in a CSV or txt file you can copy and paste it into the Genetic Affairs spreadsheet.
First select the ‘DNA Match name’ as if you were going to type in data.

Second hoover your mouse over the boundary between the ‘DNA Match name’ and ‘cM’ columns.

Third left click your mouse and paste the data into the ‘DNA Match name’ list. The same procedure is used to copy and paste data into the ‘Shared Match’ list.

Great, succinct explanation, thank you for putting this together! I particularly like that I can add match info from different companies. I do think I need to adjust FtDNA data for their less than 7 cm pieces, correct?
Yes, adjusting to 7 cM and over would be a good idea. You can use the chromosome browser on FTDNA set at 7 cM or DNA Painter has an “Individual Match Filter” here: https://dnapainter.com/tools/imf that will filter your FTDNA data for you.
Is there any meaning to the way the clusters are formed? Maternal vs paternal down the graph?
In my example both my biological parents are adopted (tough case!) so I am wondering if the formation of the clusters would clue me in to which side is maternal and which side is paternal.