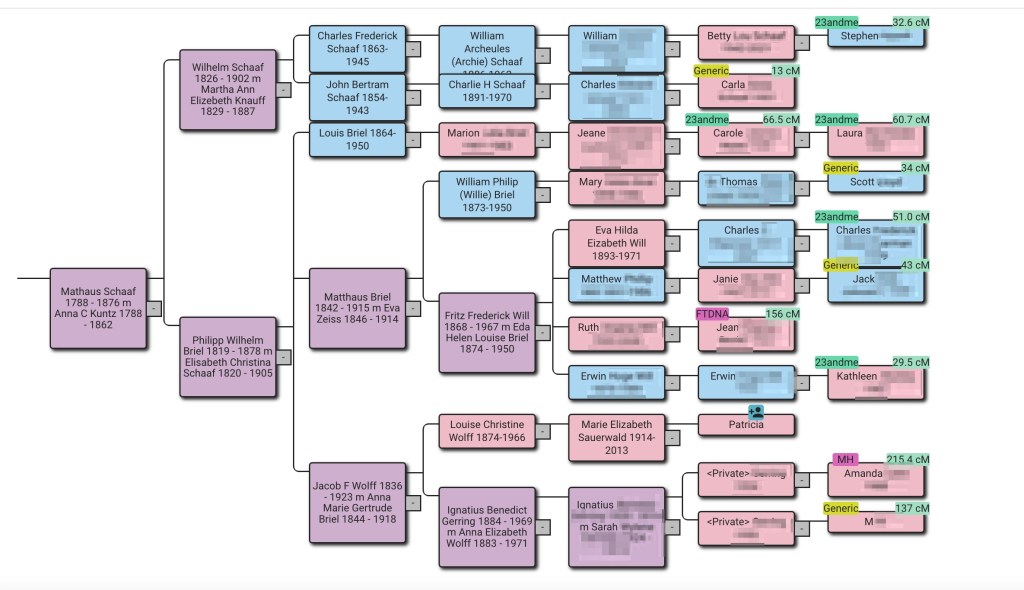
AutoLineage is the latest tool to be added to Genetic Affairs. It contains a number of the other tools, such as AutoClustering of DNA matches at any site. But the big new feature with AutoLineage is the ability to find most recent common ancestors (MRCA) for trees that you have added. These trees can be connected to DNA matches from any of the sites you have entered. I’d not realized how many of my cousins had done DNA tests until AutoLineage generated this reconstructed tree for my second great grandparents, Mathaus Schaaf and Anna Kuntz. This tree was generated using eleven trees of DNA matches and my tree. Where each DNA match tested is given as well as the amount of centimorgans we share is listed along with the match’s name. The surnames of living people as well as anyone who died after 1973 is hidden.
Getting Started
The first thing is to define a Profile for the person who has taken a DNA test. This might be you or another family member that you’re helping. I’m going to use my daughter, Jenn, for the test taker in the examples. On the left panel select “Register a new Profile.”
The following dialog box appears where you enter the name of the tester.

Now the new profile is added to the list.

Next clicking on Jenn’s name in the list brings me to the ‘Profile Overview’ page where I can add a DNA test to her profile.The flowchart leads me through the steps. First I click on ‘Register DNA Test.’.

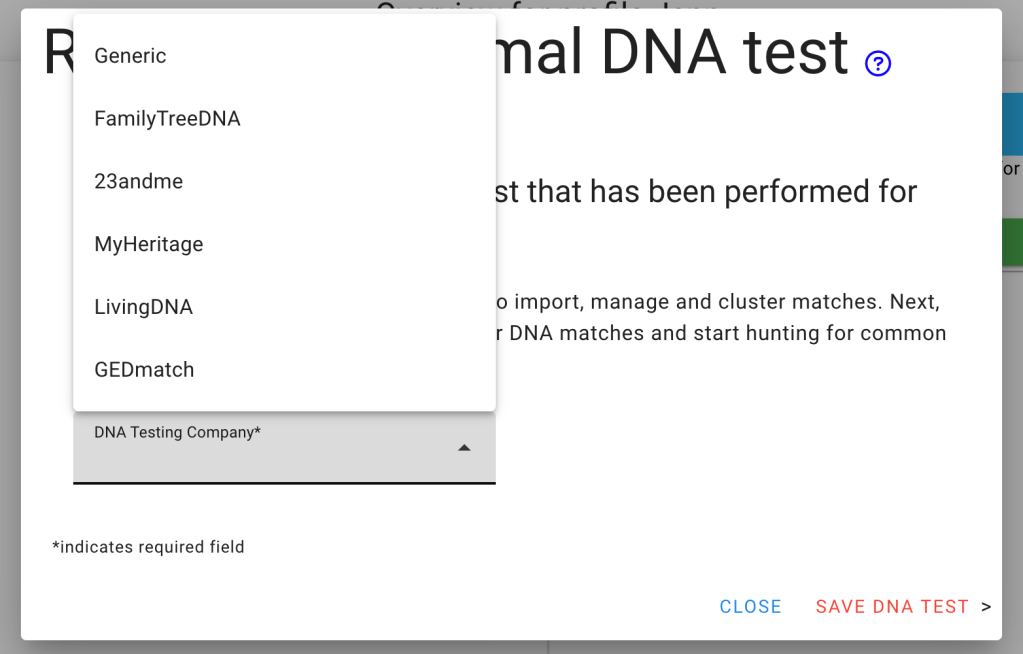
The ‘Register Autosomal DNA test’ page has a menu of the testing sites that AutoLineage supports.
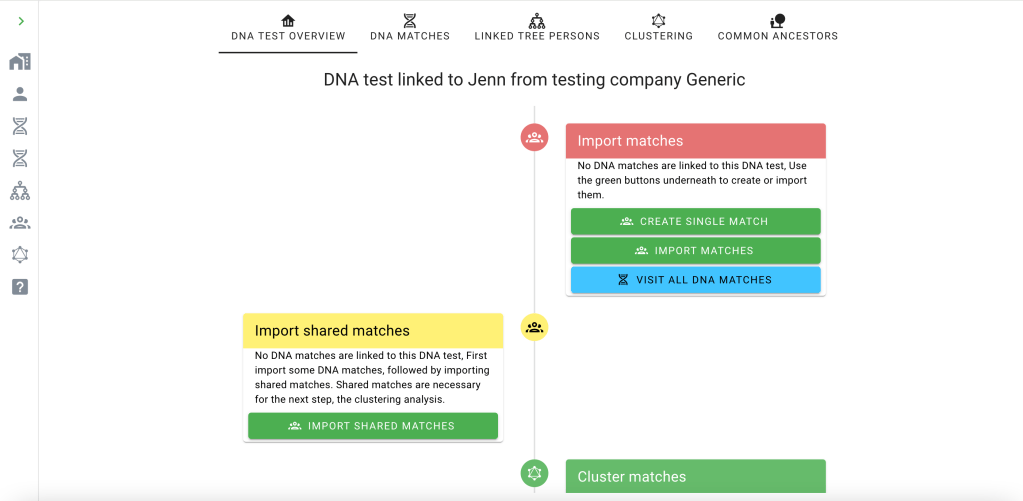
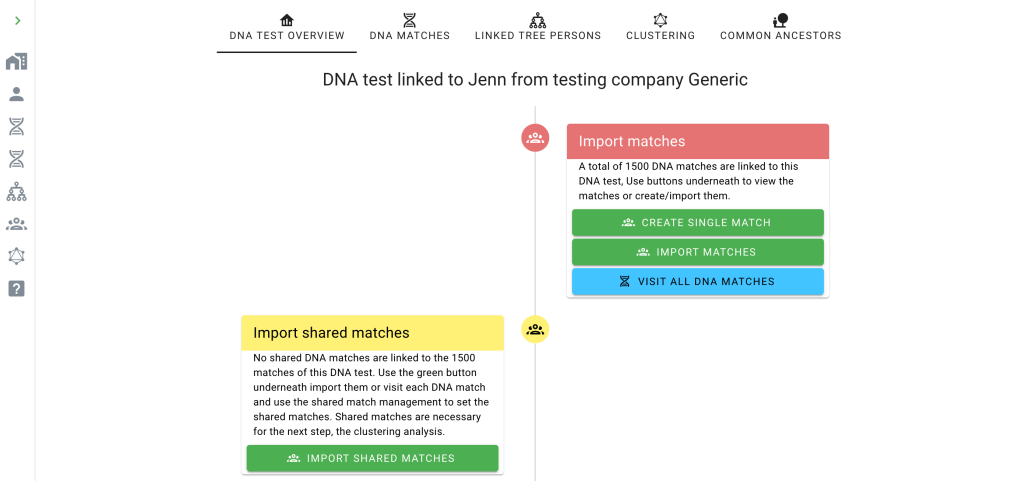
After selecting Generic from the list and clicking on “Save DNA Test,’ the “DNA Test Overview’ page shows the next step is to obtains Jenn’s matches.
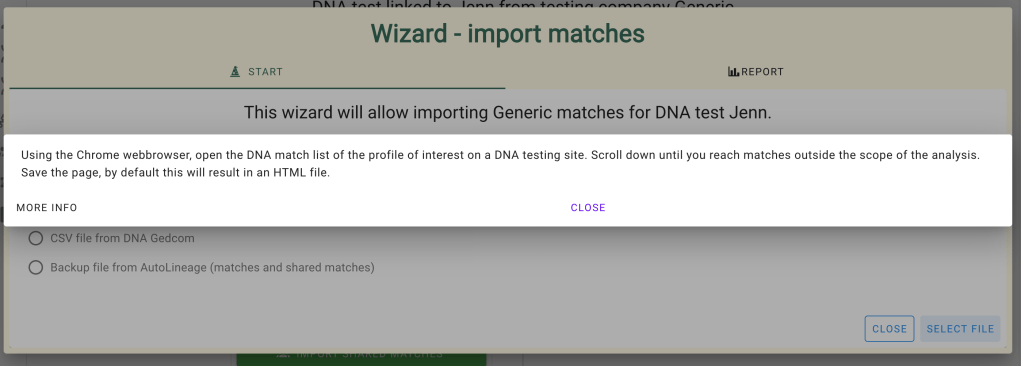
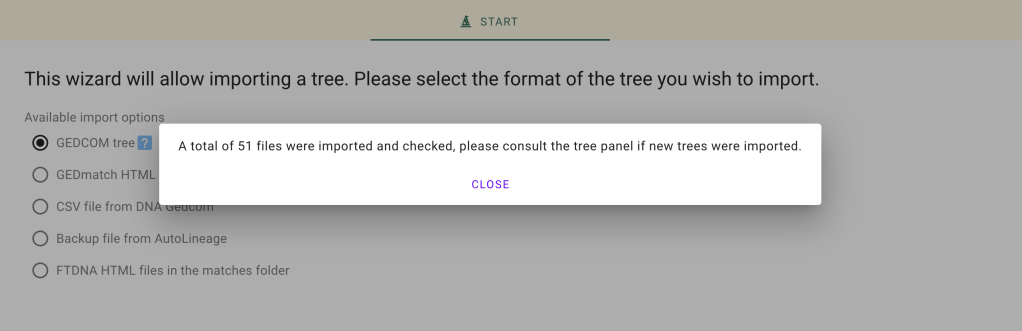
Clicking on ‘Import Matches’ brings up the Import Wizard which shows several choices for Generic.

HTML file saved is selected which puts the blue question mark next to that selection. Clicking the blue question mark provides the explanation for obtaining that data.
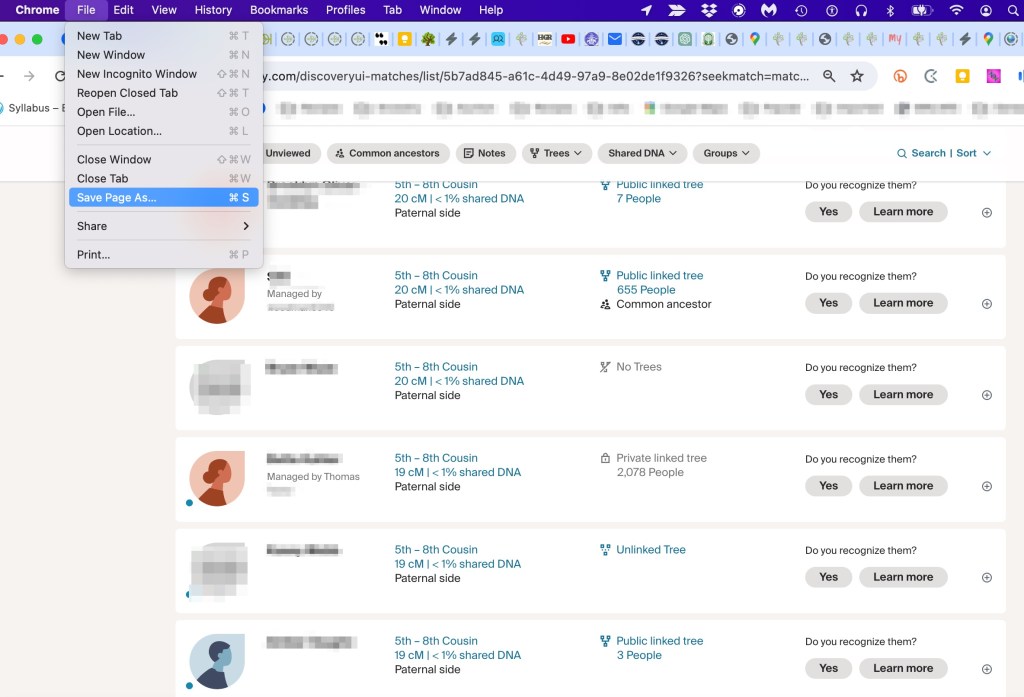
To get the matches for Ancestry in HTML format, I visit Ancestry and click on Jenn’s DNA matches.

I want to collect Jenn’s data down to 20 cM so I’ll use the scroll bar on the right of the window and go to some value below 20 cM. Alternatively I could have selected the range for ‘Close matches’ to only go to 20 cM.

Once I have Jenn’s match list down to 20 cM I’ll select ‘Save page as.’ from the Chrome File menu.
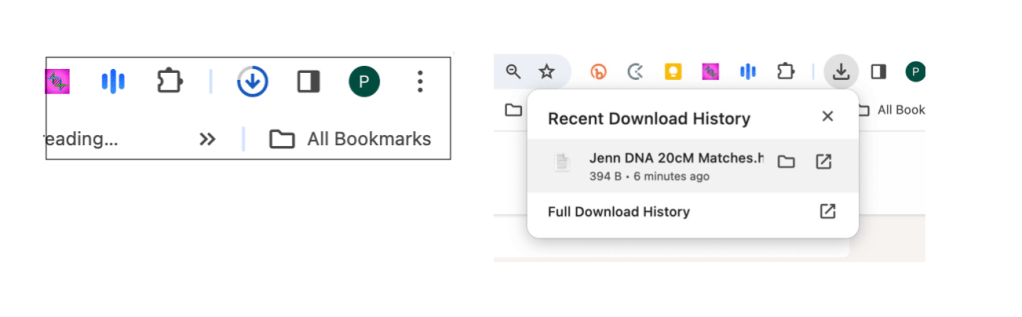
While the file is downloading you do not want to leave the page. There’s a symbol in the upper right of the Chrome page that shows a circle and an arrow. The circle around the arrow fills as the file is downloading. When the download is complete it changes to the arrow with what looks like an inbox under it. At that point the download is complete and it will show the filename. Then it’s safe to leave the page. This save will be an HTML file and a folder with a bunch of files in it. Apparently, the HTML file needs all these others, because if you delete the folder, the HTML file will not work anymore.
Then going back to AutoLineage and the Wizard to upload matches, click on Select File, and then click on Jenn’s Data 20cM HTML file.

Once the data is received at AutoLineage the Wizard reports how many matches it found.

Once the wizard is closed the list of DNA matches appears.

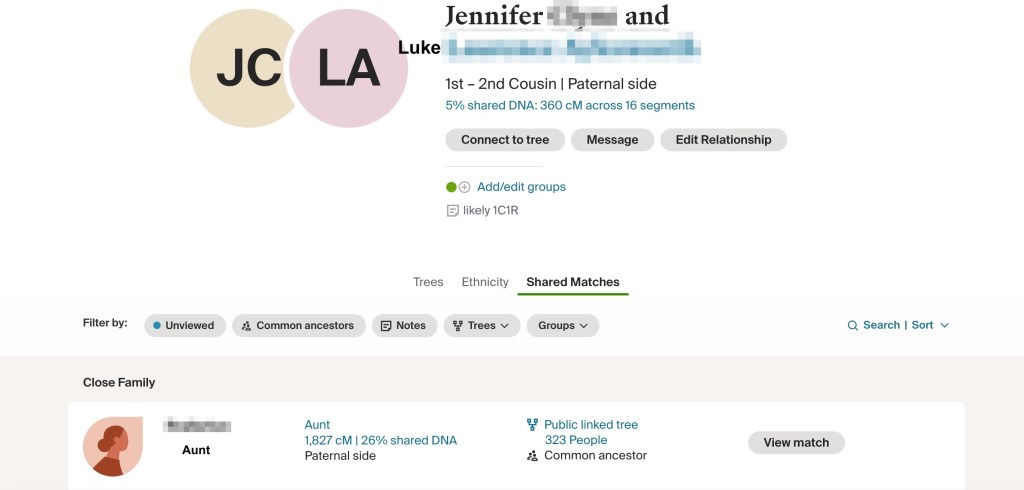
The list shows how many cM the match shares with Jenn and which side of the family the match is predicted to be on. I have very few close cousins, so having all the of matches, except me on Jenn’s paternal side makes perfect sense to me.
Next I can add shared matches for her list of matches. He aunt and Barb, who is a 1C1R will match many of her DNA matches, so I’ll start with Luke since he’s just below 400 cM. I go back to ‘DNA Test Overview,’ and can select ‘Import shared matches.’
The ‘Import shared matches’ wizard looks very much like the import matches one. Here you can select all of the shared matches at once. Again go back to the test site and visit the match of interest and their shared matches.
Once again I scroll down to the bottom of the list of shared matches and select ‘Save Page As.’
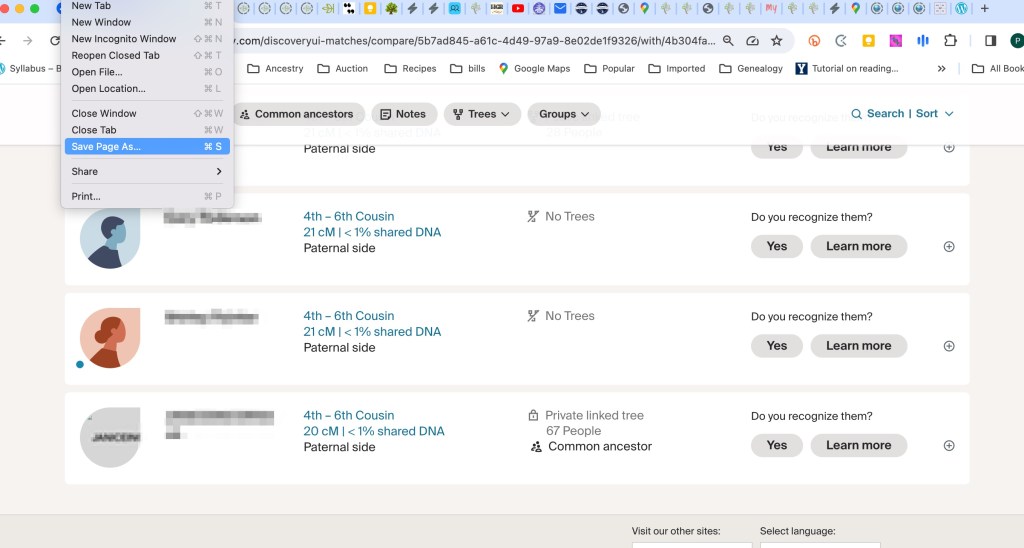
Again wait for the little symbol to show that the file has been downloaded.

Depending on how far down in cM you want to run your analysis collecting all of the shared match data for every DNA match can be time-consuming. But then it’s all there on your computer and you can run whatever range of cM that you choose.
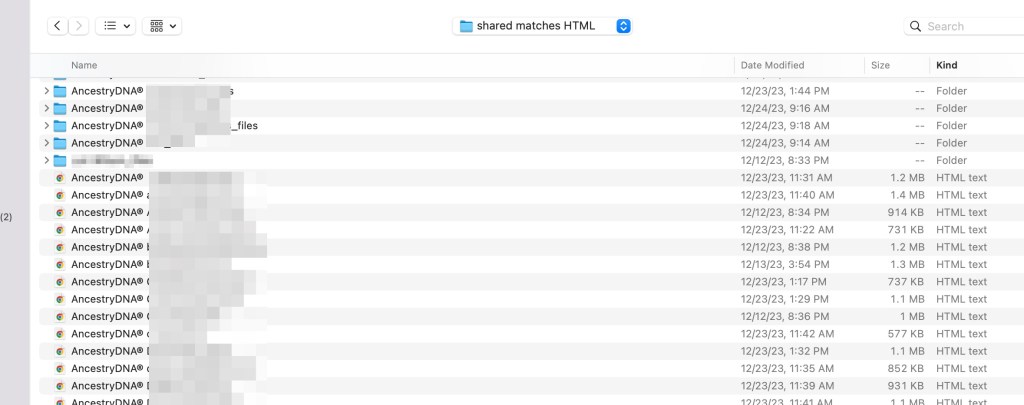
I sort my list of matches by file type which I find makes it easier to add all the shared matches HTML file at one time.
After saving the shared match HTML files for all DNA match, go back to the import shared matches wizard, and select all HTML at once. While the shared matches are being added to AutoLineage the Wizard will often give a message about what it’s doing.

When all the files are added the Wizard will give a message about what it has found.

Now the ‘DNA matches’ has been updated to show the number of shared matches each match has.

Going back to “DNA Overview’ shows that running a cluster of these matches is the next item available.

To get clusters for Jenn’s data that has been added, I’ll ‘perform clustering analysis.’

As you can see there are several different options. A Leeds-type analysis can be run using the matches from 400 to 90 cM, or a cluster using all the data can be run. If all the data is used, it can later on be reduced to view only 400 to 90 cM without rerunning the cluster. Different types of clustering algorithms can be used. ‘Normal’ is the type of cluster usually seen from the various software packages. Also, different color schemes can be used.
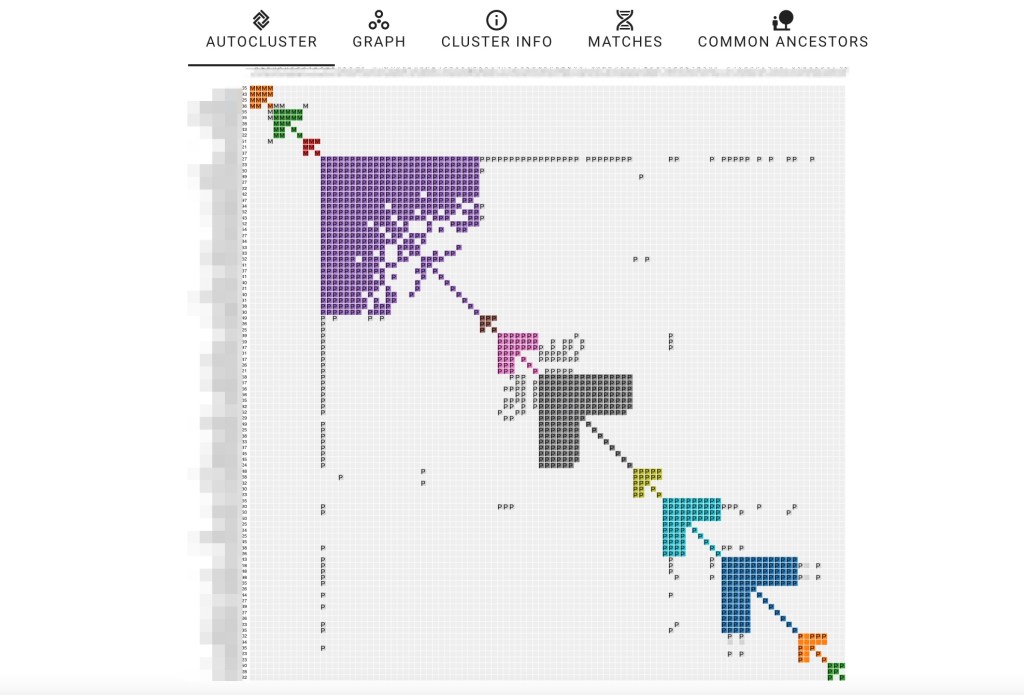
Not surprisingly the match in the purple cluster who matches almost all the others is Jenn’s paternal aunt.
Now I can take that cluster and change the range of matches that I want to see by changing the min and max number of cM..


At the top of the page for the AutoCluster are some other options. Clicking on ‘Graph’ brings up a Gelphi type display.
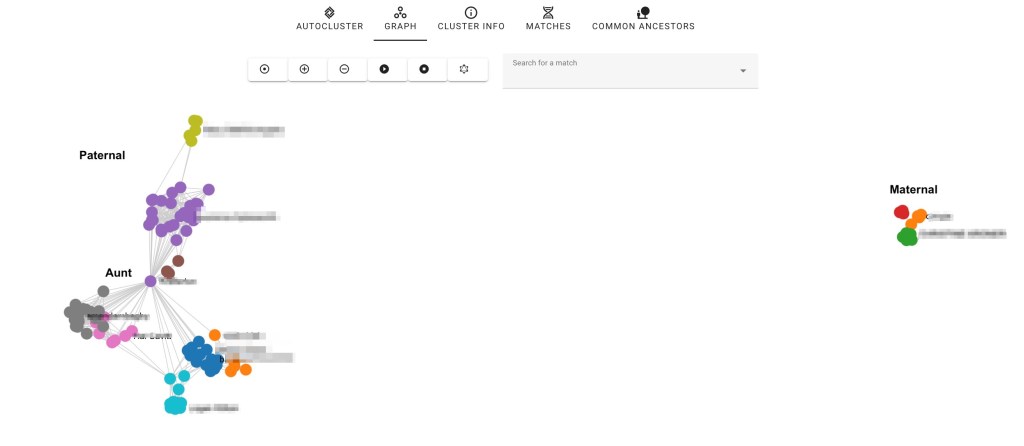
The majority of Jenn’s matches are paternal. I’m an only child and my closest cousins are second cousins. Several of them share DNA with Jenn, but not many whereas she has a lot of paternal cousins who show up in her matches.
‘Cluster info’ allows you to add any comments you want for the cluster. ‘Matches’ provides more details of the matches in the cluster. It has the matches’ names, the cM, the color of the cluster that contains that match, the number of ICW (In Common With) matches, which side of the family where the match is located and the cluster number, I’m in the first, orange cluster. In the green cluster is my second cousin, Patricia Harris Anthony, who has given permission to use her real name, At this point we’ve not found ‘Common Ancestors.’

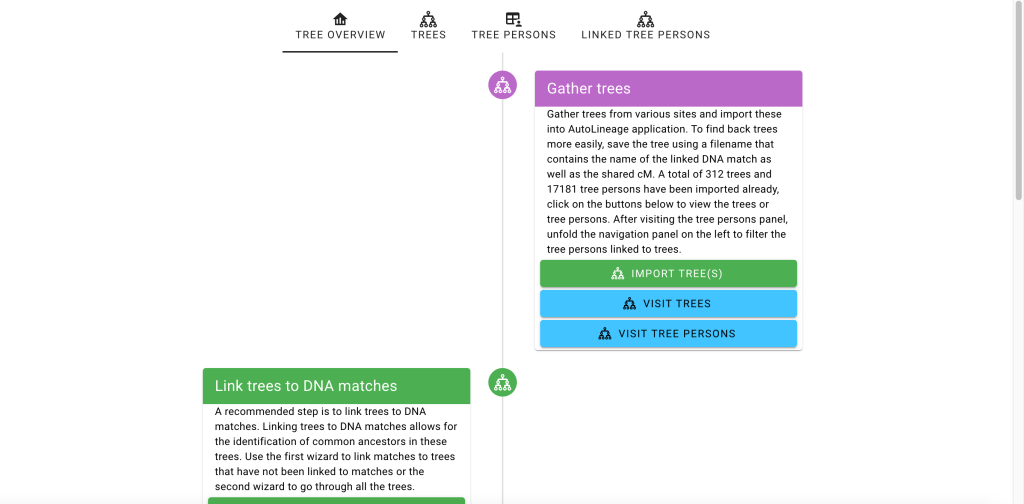
Next selecting ‘Home’ from the left panel and then ‘Jenn’ for profile and scrolling down the next item on the flowchart is to gather trees.

Trees do not depend on the DNA site where a match has tested, For example, if someone has tested on several different sites their tree would not be different from one site to another. They might have a larger tree on one site than another but only one tree is needed to identify their family. Ancestry and MyHeritage seem to be the sites that have the most family trees. FamilyTreeDNA and GEDmatch have a smaller number in comparison. Clicking on ‘Gather Trees’ takes us to the ‘Tree Management’ page and flowchart.
Clicking on ‘Import Trees’ bring up the ‘Import tree wizard,’ which gives several choices for trees partly depending on where the match’s DNA data is located.

Again there is information on how to get the GEDCOM trees at the blue question mark.

One2Tree is a Chrome extension provided by NordeboApps Handelsbolag. A free version will give you four generations, but many trees are larger than that and depending on your family, you’d want to be able to go farther back than that. A subscription to One2Tree is 79 SEK (Swedish Krona) which is currently $7.48 US dollars.
Jenn’s highest match under 400 cM was Luke, but he does not have a tree. Moving to her next match, Helen, she does have a tree. Helen has three different unlinked trees, After looking at them we find the one that connects to Jenn’s family,. Clicking on her tree brings up another tab. You might have to go from the shared match page to ‘expand tree’ and then right click to get the detailed tree. Change the tree into ‘horizontal’ view and then use One2Tree from the Chrome extension to save the gedcom.

Once you have One2Tree installed as one of your Google extensions it will be shown in your list of extensions. Select it and the program will appear allowing you to save a gedcom of the tree.
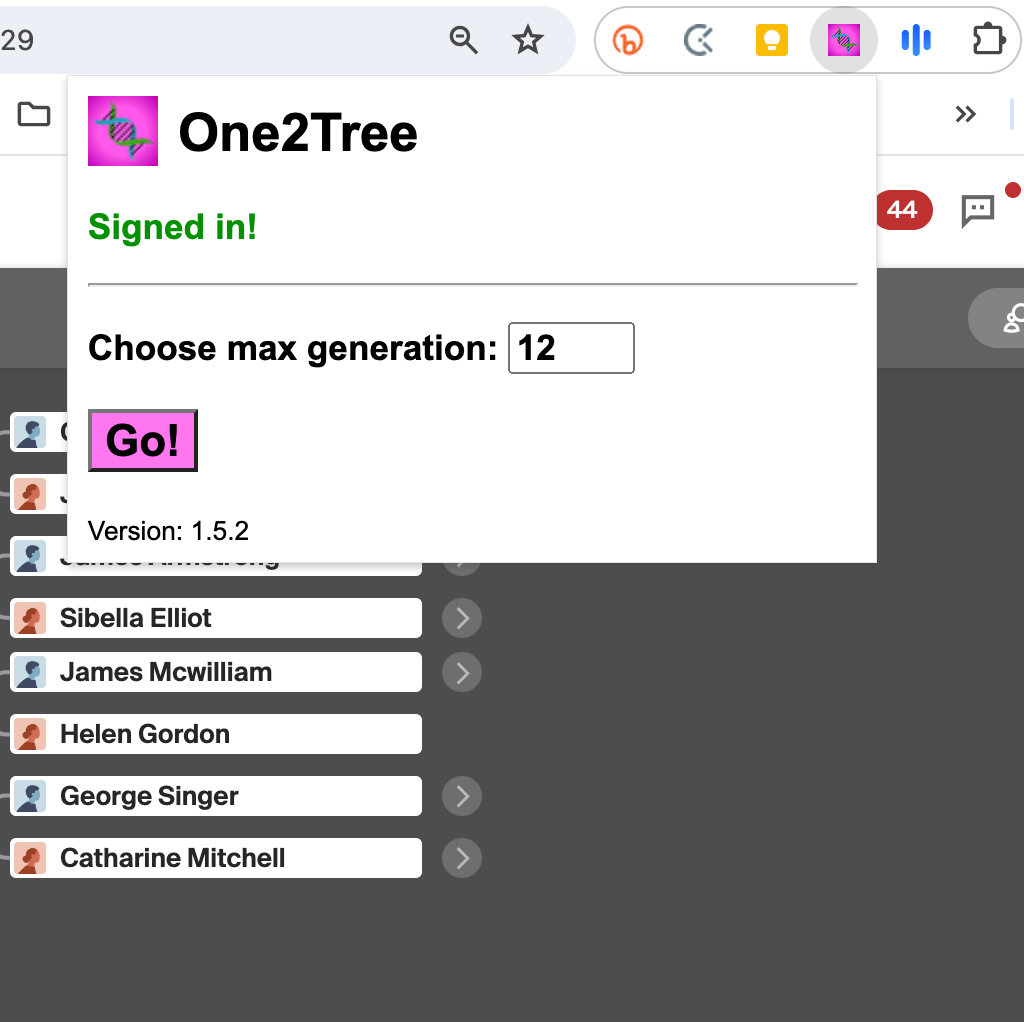
After selecting One2Tree a dialog box appears asking if the person whose pedigree is shown is male or female. This one is for Helen, so I selected female,
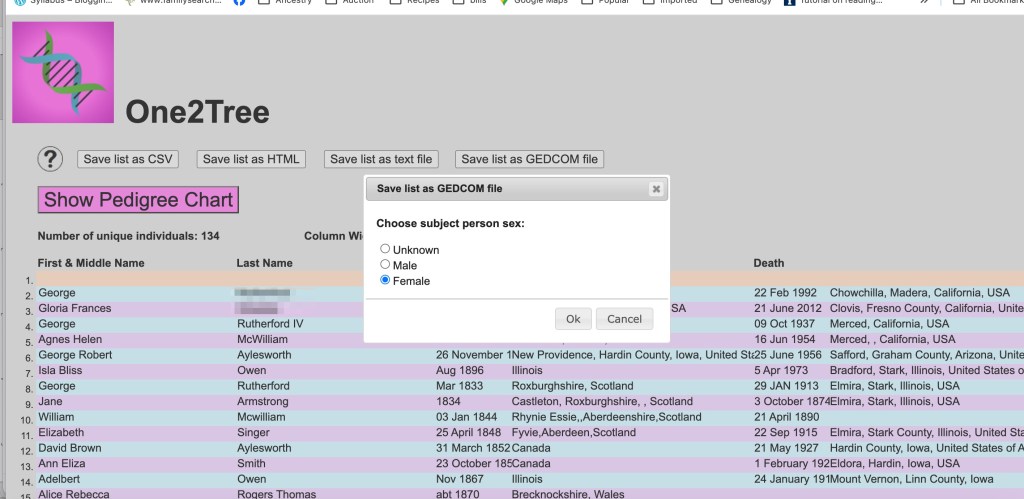
Clicking on ‘Ok’ saves the file to my Download folder with filename One2Tree. Then I rename the file with Helen’s name and shared cM and move it to a folder of gedcoms for Jenn. When matches, like my second cousin Patricia Harris Anthony, match several of us, I have another folder for more general gedcoms. I know that none of Jenn’s paternal matches match me, so I keep them in her gedcom folder. This is my method for avoiding more than one gedcom for any match,

Just like with collecting shared matches, now I go through the match list and generate gedcoms for all the matches. Next they are added to AutoLineage with the ‘Import Trees Wizard.’
After closing the Wizard the list of trees appears.

Clicking on ‘Tree Overview’ brings up the flowchart for trees.
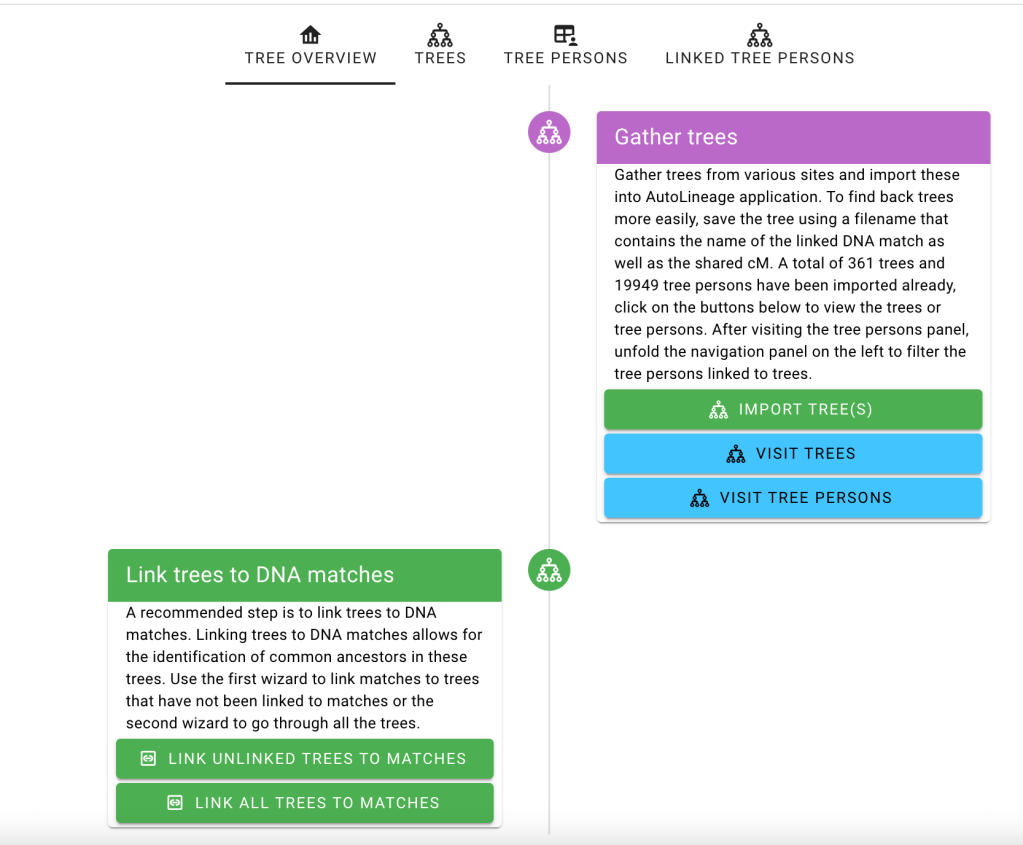
There are two options to link the trees. If you are setting up trees for the first time either option will give the same results. If you’d already linked some trees and want to link new ones that you’ve just added, select ‘Link Unlinked Trees.’ Since you only one copy of a person’s tree in AutoLinage, when a match has tested at more than one of the testing sites, use ‘Link All Trees’ to add additional DNA matches to the existing tree.

The Wizard added Haley’s picked up Haley’s first name and then found all DNA matches with first name Haley. I’ve found if the first name doesn’t bring up the correct match, delete it and put in the last name. For example, if a match used an initial and a last name, the initial might bring up a long list, and searching with the last night would be faster. Sometimes there may be a long list of DNA matches and the match’s name is not shown. There is a slider to the right of the window that lets you easily move down the list.

Alternatively, the DNA match can be linked to the tree from the ‘Tree’ page by clicking on one of the DNA matches. Here I clicked on Helen in the tree list, which brings up her tree. Then clicking on her name the option to ‘link to DNA match’ appears.
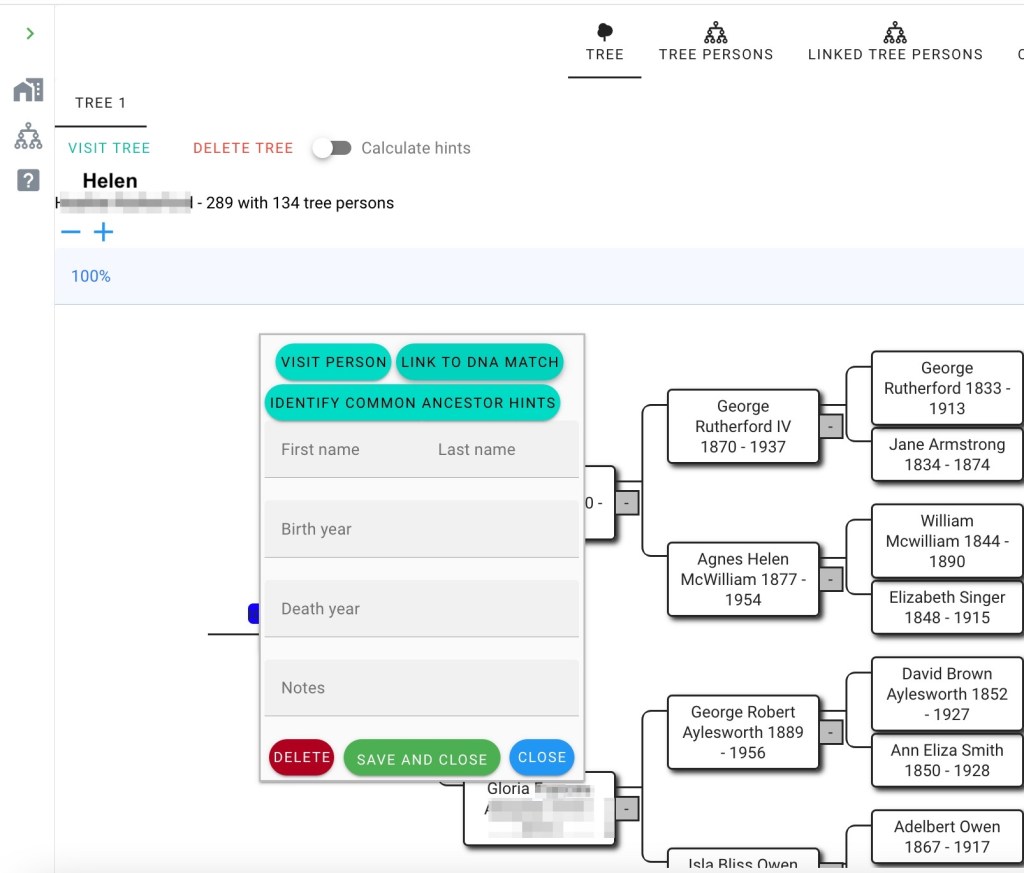
Clicking on “Link to DNA Match’ brings up the Wizard that links the tree person to a DNA match.

After saving that this is the correct person, the tree shows the DNA match. Clicking on the icon shows the information about that match.

The next step is to add Jenn to her tree.
Clicking on ‘Jenn’ brings up her tree, which currently only has her in it. Her tree was loaded along with the other gedcoms. Now it just needs to be connected to her profile.

Clicking on ‘Link to Existing Tree’ brings up the Wizard.
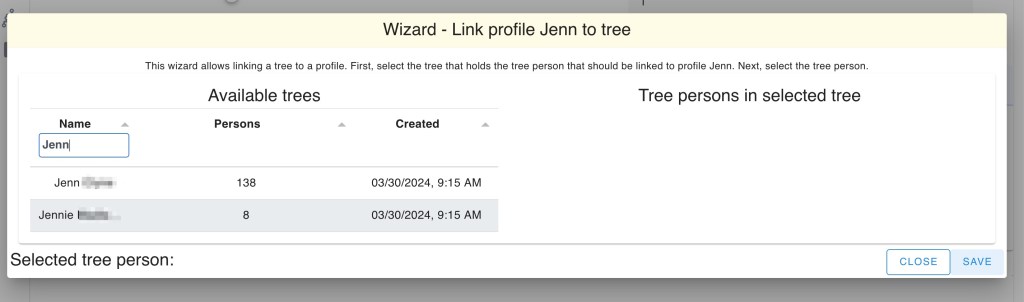
Selecting ‘Jenn’ brings up her tree and then I only need to select her in it.

Saving the connection of Jenn to the root person of her tree.
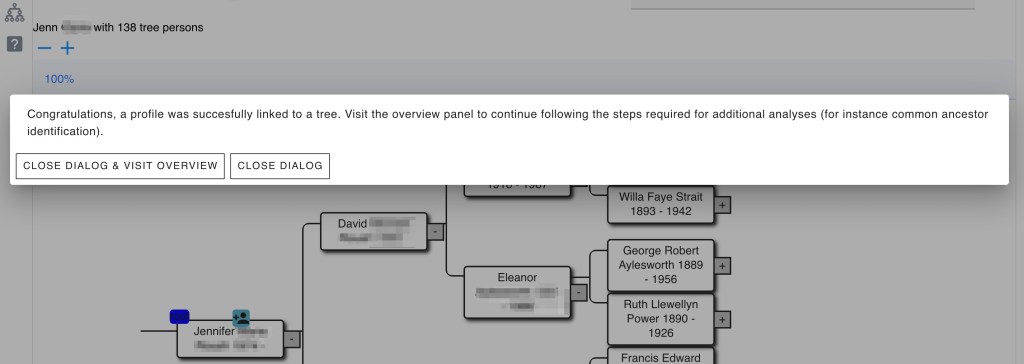
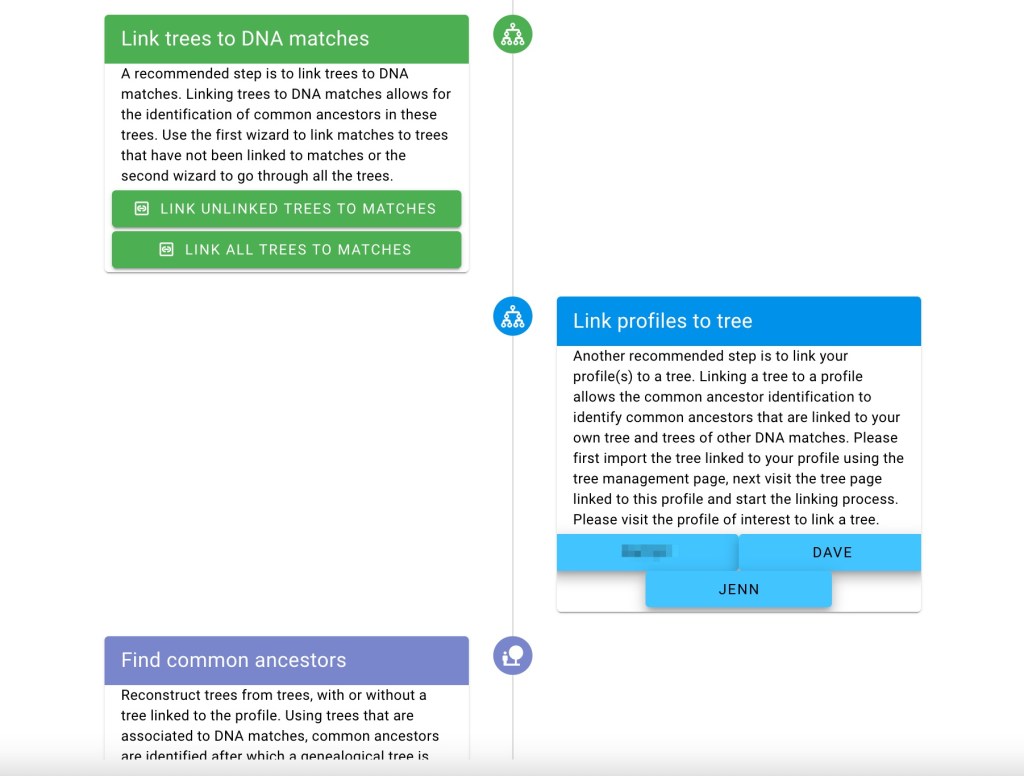
After attaching all the trees to their DNA matches, I go back to ‘Home’ and click on ‘Jenn’ in the profile list. Scrolling down the flowchart the next item on the list is to ‘Find Common Ancestors.’
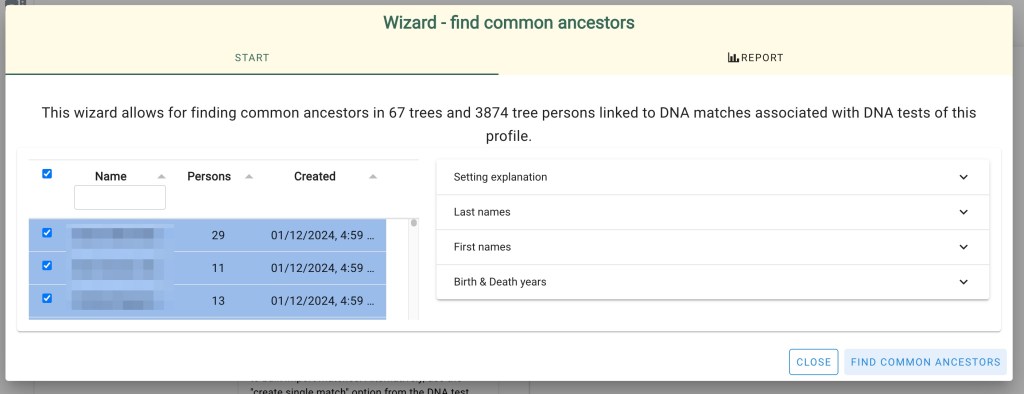
There are several choices for finding common ancestors. Searching on last name or first name, or changing the birth and death dates. I’ve changed the dates for some of my runs. The default is without 2 years and using 1800 for birth year. I’ve changed that at times when I know the MRCA for a group of people is earlier than that.
Occasionally when I’ve run the ‘Find Common Ancestor’ Wizard I get a warning that it is taking too long, and asking if I want to ‘wait’ or ‘stop.’ This just depends on the number of people and trees that you have. I either tell it to ‘wait’ or do nothing and it keeps running. I didn’t see that for Jenn’s trees.
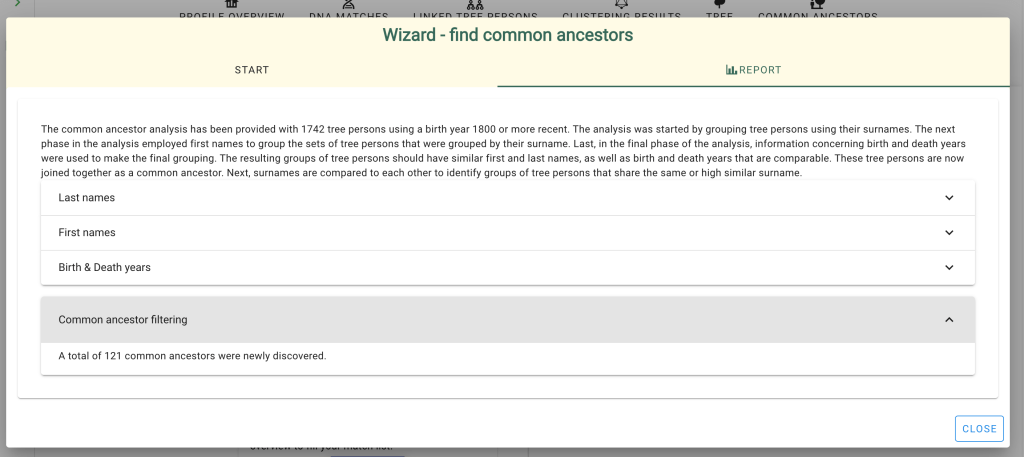
The Wizard says it’s found 121 common ancestors.

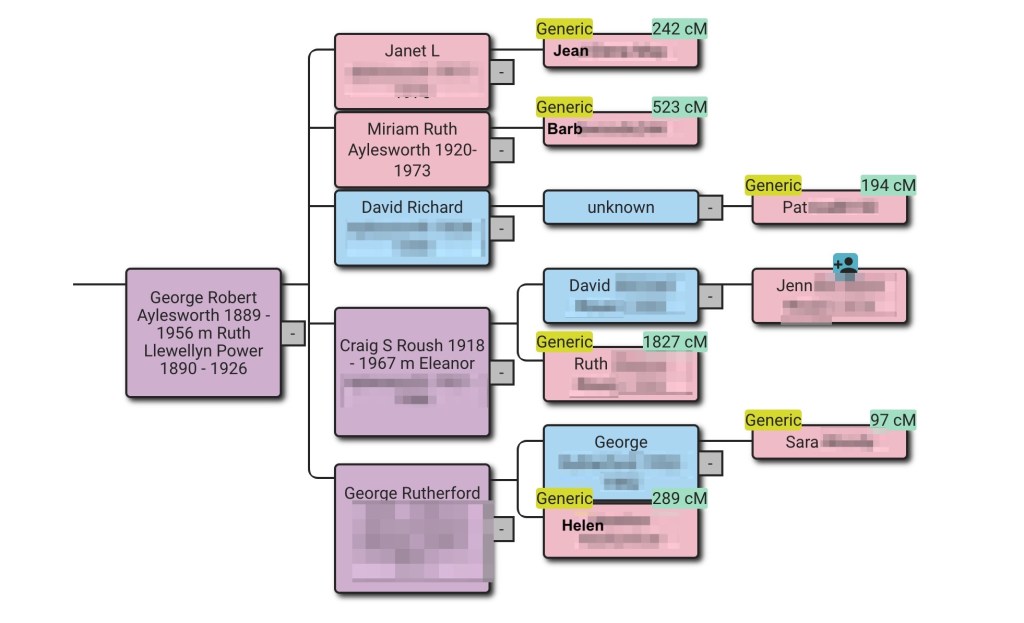
The above tree shows Jenn’s father’s paternal line through her fourth great grandparents. The fourth great grandparents are the MRCA for Jenn and two of her third cousins twice removed (2C1R) who also have taken DNA tests.
However, some of the trees aren’t always as pretty as you might like. So what has happened here? This is likely do to some information in the trees not being the same. Some examples of this are birth or death dates varying more than the 2 year default, one tree using maiden names and another used married names for the same women, or middle names in one tree and initials in another.

Looking at the information in the red half-circle. We see that Pat listed Ruth L Power in her tree, whereas the other trees have Ruth’s middle name, Llewellyn, listed. This causes AutoLineage to not recognize that it’s the same person.

This is easy enough to fix. Above the reconstructed tree is the option to view the trees that were used in making this reconstruction

Clicking on ‘Linked Trees’ we can select Pat’s tree and edit Ruth’s middle name to match what the other cousins listed.

Clicking on Ruth L Power lets me edit her middle name to match what the others have,
Now going back to the ‘Reconstructed Tree’ we can see that Ruth’s middle name has been added for all of her children.
Summary
AutoLineage is a game-changer. The first example at the top of the blog showed my maternal family tree generated from twelve family trees and eleven DNA matches to me across all the testing sites. The rest of the blog detailed how to set up AutoLineage, cluster the matches at one site, add trees connected to DNA matches and then find common ancestors. Future blogs will demonstrate adding DNA from other sites as well as more hints for ways to edit and prune your trees of discrepancies.

Leave a comment